What version of WooCommerce is supported?
A: Version 4.0.11 only Works with WooCommerce 3.0.
Version 4.0.10 and lower works with WooCommerce 2.x.
How does it work?
A: The plugin displays a countdown at the bottom of your product or a page, post or custom post type. It gets the data from a WooCommerce product that is currently on sale.
It looks like this:

How can I set it up?
A: Please follow the instructions that you can find on the “How to set the Product Countdown WordPress Plugin up“-page.
Are there any requirements?
A: Yes of course. You need the following:
- A self hosted WordPress blog installation
- The latest WordPress version. At least WordPress ? 4.7
- At least PHP 5.6 running on your webserver. Click here if you want to know more about how to upgrade to the latest PHP version.
- WooCommerce higher or equal 3.0
Where can I set the countdown?
A: The countdown can be set on your WordPress product.
- For this, log-in to your WordPress administration panel
- Go to “Products”
- Choose the WooCommerce-product you want to edit
- Scroll down to the “Product data” settings
- Click on “General”
- Type-in a price into the “Sales-Price” field
- Click on “Schedule”
- Save your settings.
- Your countdown now have been set.
Fore more information on this, please refer to the “How to set the Product Countdown WordPress Plugin up“-page.
Can I change the color of the countdown elements?
A: Of course you can.
I want the countdown to display only when the user scrolls down the page. How can I achieve this?
A: For this, please follow this steps:
- Log-in to your WordPress administration panel
- Go to “WooCommerce” and click on “Countdown”.
- Check the checkbox of the field “Show Fade-in helper”. This will display a little helper on your product page that have countdowns.
Then:
- Go to “Products”
- Choose the WooCommerce-product you want to edit
- Scroll down to the “Product Countdown Settings”
- Switch the functionality ON
- Save your settings.
Then:
- View your product on the frontend
- A little helper appears on the top left which makes it much easier for you to find the correct position. The helper looks like this:

- Scroll down to the place where you want the countdown to appear.
- Then copy the number that the helper displays.
- Edit your product again and scroll down to the “Product Countdown Settings” again.
- Enter the just copied number to the “Fade in at position”-field.
- Save your settings.
- Visit your product page again and reload it.
- Now the countdown should appear only at the position you’ve chosen.
Fore more information on this, please refer to the “How to set the Product Countdown WordPress Plugin up“-page.
I want the plugin to send me an email after a countdown has expired, but it seems this doesn’t work. What’s wrong?
- Constantly checking if a countdown has expired is very resource-consuming on WordPress. So we’ve set up an hourly event that does the job. It searches for countdowns that have expired and sends an email to the email address you’ve entered on the settings metabox.
- Please note the following limitation: Due to the fact that events on WordPress are not the same as Linux cronjobs it can be that an event never gets fired. WordPress always checks if there are things to do when there is a page-visit. So if no one visits your page until the Countdown has expired, your email never gets send out to you till you visit your page yourself. This is a “natural” limitation of WordPress that we cannot care about. You can read more about the limitations on the wp_schedule_event page on WordPress.
- Please also note that actions will not work on variable products.
Can I also set a time not only a date?
A: Yes. This is possible in version 4.1.0 and above.
What’s the shortcode and how can I use it?
A: This is the shortcode you can use in your posts, pages or custom post types:
[product_countdown]Please note the following: You have to turn the product countdown explicitly ON in the settings-metabox on the page you want to use the countdown shortcode. Otherwise it will not be displayed.
Can I use the shortcode and the popup at the same time?
A: No.
Does it work with product variations?
- Since version 3.1: Yes. But there are some limitations. This means the following:
- When a product page is loaded and it contains one or more product variations it always loads the countdown for the first variation found that has a sales date. But the countdown gets updated when a variation is selected and it has a sales date.
- Please note that actions will also not work for product variations.
Can I show the plugin on the homepage, front page, archive pages, search pages or anything like this?
Since version 3.3 it’s possible to show the countdown on the frontpage. For this, just go to the settings page and choose a product. Save your settings. Then edit the product and set the countdown to “ON”. It should then appear on the frontpage.
How can I add a background image to the countdown timer?
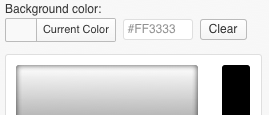
You can add your own CSS styles on every product page or you can add them globally (on the settings page). If you want to add a background image globally make sure to add the !important tag at the end to ensure that it does not get overwritten by the product page css settings. You can also set the background color back to it’s original value (clear the background color (see picture to your right).
To changes colors for both the shortcode version AND the popup version you can use this snippet. Note the !important at the end.
.product_countdown {
   background: url("url-to-your-image.jpg") repeat scroll 0 0 transparent!important;
}
You can do the following to only set the background image of the shortcode version:
#product_countdown_shortcode {
  background: url("url-to-your-image.jpg") repeat scroll 0 0 transparent;
}
Or you can do the following to only set the background image of the popup-version:
#product_countdown {
   background: url("url-to-your-image.jpg") repeat scroll 0 0 transparent;
}
If you want to globally add your own styles make sure to add the !important tag at the end, like this:
#product_countdown {
   background: url("url-to-your-image.jpg") repeat scroll 0 0 transparent!important;
}
Can I add the countdown even when a product has no sales price / is not on sale?
No this does not work at the moment. The plugin relies on the WooCommerce functions. And WooCommerce internally checks if the product is on sale. This means that it also won’t work when sales price is the same as the normal price.
in order to activate the countdown I have to enter a sales price – is it possible to avoid this somehow?
Yes, you simply need to leave the regular price blank and set is as a sales price instead. This avoids the strikethrough and still activates the countdown.
Which filters can I use?
-
wpbpc_is_countdown_active_pre
You can replace the_countdown_activeproperty by your own function before any operations (like calculation of dates and times) are done. The filter hands over two parameters:-
(null) $return(default value:null). Activate the filter by returning either true or false. -
(WPB_Product_Countdown) &$thisObj. Passed by reference. Don’t forget to write values into the_dates_toand_dates_fromproperties.
-
-
wpbpc_is_countdown_active
You can replace the_countdown_activeproperty by your own function (after all operations are made). The filter hands over two parameters:-
(true) $return(default value:true). Activate the filter by returning either true or false. -
(WPB_Product_Countdown) &$thisObj. Passed by reference.
-
-
wpbpc_ext_load_time
You can set the filter tofalseif you don’t want to include the WooCommerce extension to allow setting the exact time (hour and minute) on sales dates.
Can I use variables in the description text field?
Yes you can. These placeholders are available:
-
$price
Displays the regular (old) price -
$sales_price
Displays the sales (new) price -
$sold_items
Displays the number of items sold already -
$stock_items
Displays the number of items in stock -
$difference_in_percent
Displays the difference between the sales price and the regular price. The mathematical formula is: (( $regular_price – $sale_price ) / $regular_price * 100 ) -
$sale_price_in_percent
Displays the percentage of the sales price from the regular price in percent. The mathematical formula is: ($sale_price * 100 / $regular_price)
Can I automatically activate the Countdown for all products when WPAllImport is used?
Yes this works. However you need a little workaround. Please follow these steps:
- Here you can find the Countdown Import Helper Plugin. You can download it here.
- Install the plugin in to /wp-content/plugins/ folder.
- Activate the plugin from the plugin list in your WordPress dashboard.
- Then import your products using WPAllImport with the following additional setting:
- Set up a custom field with the name “_wpbpc_countdown” and set its value to 1.
- That’s it.