The Google Search Engine is one of the most advanced search engines in the world. And of course, it’s free of charge because Google earns an unbelievable amount of money just by selling ads on its search engine platform as well as on other websites (display ads), too. For us the Google Custom Search Engine is perfect to integrate in WordPress because a) WordPress is one of the most popular blog CMS in the world and b) it has a bad search engine integrated into it. So it’s time to replace it anyway. Plus: Most of us earn money with websites (maybe through niche sites). Therefore it’s nice to have another income stream by using the free version of Google’s Custom Search because it allows us to link it with Google Adsense. What you can expect from this article is the following:
[box type=”warning”]Please check out my Google Custom Search WordPress Plugin which does most of the steps below for you automatically.[/box]
Contents
- Why you need the Google Custom Search on your WordPress blog
- How to create a Custom Search Engine
- Learn what On-Demand Indexing and On-Demand-Removal is
- How to configure the Custom Search engine via the user interface
- How to integrate the Google Custom Search into WordPress
- How to configure the Google Custom Search WordPress Plugin
- Conclusion
[box type=”info”] Note: In this article I’m always talking about the Google Custom Search. There is another product which is called Google Sitesearch. The most important difference is that Sitesearch is paid while the custom search is free (and therefore contain ads). You can read more about all differences between the Sitesearch and the Custom Search here. All right. Let’s start![/box]
1. Why you need a Google Custom Search
1.1. Bad WordPress Search Engine?
I guess the best argument why you need a Google Custom Search is that WordPress has a really bad search engine integrated into it. And as a programmer I know why: the fact is that it’s really challenging to code a search engine. For me it’s crystal clear that no one at WordPress or from the community wants to improve it because it will never be good enough. Google is out there since 1998. This are more than fifteen years where Googlers working on the engine improving it over and over again. Just think of the manpower they put into the development of the search engine. It’s just unbelievable.
When you take a look at the get_posts function on the current WordPress code you can see it has more than 850 lines of code just do handle the query for SQL. A typical request when the search.php (template file) gets loaded looks like this (where KEYWORD is the search term):
SELECT SQL_CALC_FOUND_ROWS wp_posts.* FROM wp_posts
WHERE 1=1
AND (((wp_posts.post_title LIKE '%KEYWORD%') OR (wp_posts.post_content LIKE '%KEYWORD%')))
AND (wp_posts.post_password = '')
AND wp_posts.post_type IN ('post', 'page', 'attachment')
AND (wp_posts.post_status = 'publish' OR wp_posts.post_status = 'closed')
ORDER BY
wp_posts.post_date DESC
LIMIT 0, 10
If you’re familiar with MySQL you know where the problems are:
- The search gets slower the more posts you have.
- The more words you add the complexer the query goes (and the slower the query will be in the end).
- There is no “relevance rank” which means that the search results will be weird.
Just for completeness and as an example here is the query for the keyword “my car”:
SELECT SQL_CALC_FOUND_ROWS wp_posts.ID FROM wp_posts
WHERE
1=1
AND (((wp_posts.post_title LIKE '%my%') OR (wp_posts.post_content LIKE '%my%'))
AND ((wp_posts.post_title LIKE '%car%') OR (wp_posts.post_content LIKE '%car%')))
AND (wp_posts.post_password = '')
AND wp_posts.post_type IN ('post', 'page', 'attachment')
AND (wp_posts.post_status = 'publish' OR wp_posts.post_status = 'closed')
ORDER BY
wp_posts.post_date DESC
LIMIT 0, 10
Let’s assume you have two posts with the following content:
| ID | Title | Content |
|---|---|---|
| 2 | Home sweet home | My car is really great! |
| 1 | My car | This is a blog post about my car. |
What do you think will be on top of the search results? Yes, it’s the post with the ID 2. It doesn’t make sense to you? You’re right. As a human you would love to see the post with the title “My car” on top of the search results because it has more relevance than the post with ID 1. But a machine doesn’t really understand that.
Of course there are a lot of possibilities out there to improve MySQL as well as it’s search behaviour (just think of fulltext search). I don’t want to go in detail because this is very technical and I know that you’re now saying: “Stop that! I just want good search results”:-) The only thing I wanted to say is: of course it’s possible to do a full text search. But you know what? It will never be as good as Googles. And it requires a full bunch of tech-knowledge to achieve that. The matter of fact is: we need an easier solution for this.
1.2. No Caching for Custom Search Query Parameters
The second thing is that the search results for the built-in WordPress search doesn’t get cached (by a plugin). This is because in most cases every single search query is different. So with every search the PHP parser has to do a MySQL-search (which might be slow). Look at the picture below:

What do you think is faster? (Hint: the second one). In a Google Custom Search you don’t have to worry about these things. Your WordPress blog just loads an “empty” page with a little JavaScript in it. The script does the rest and renders the page. That’s it. As easy as that!
1.3. You do not know what your users are searching for
The third thing is, that – of course – you do not really know what users have searched. With a Google Custom Search engine WordPress plugin it’s possible to link it with your Google Analytics account. That gives you total control over the search terms. Especially if you have a lot of content on your site and the users are using your search form heavily.
2. How to create a Custom Search Engine
You can follow these steps:
- First, you need a Google account. If you don’t have one click here to do so.
- Then head to the Google Custom search landing page and click on the “Sign in to Custom Search Engine” button (big blue button on the top right)
- Login-in using your Google Account
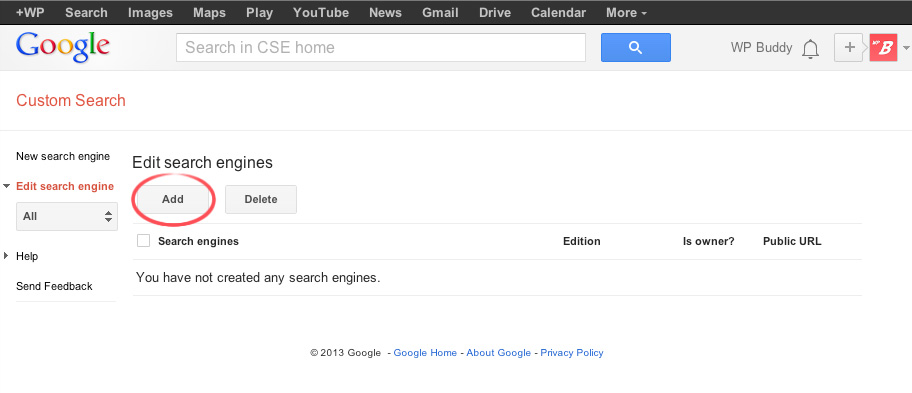
- Click the “add” button on the top to add a new custom search engine

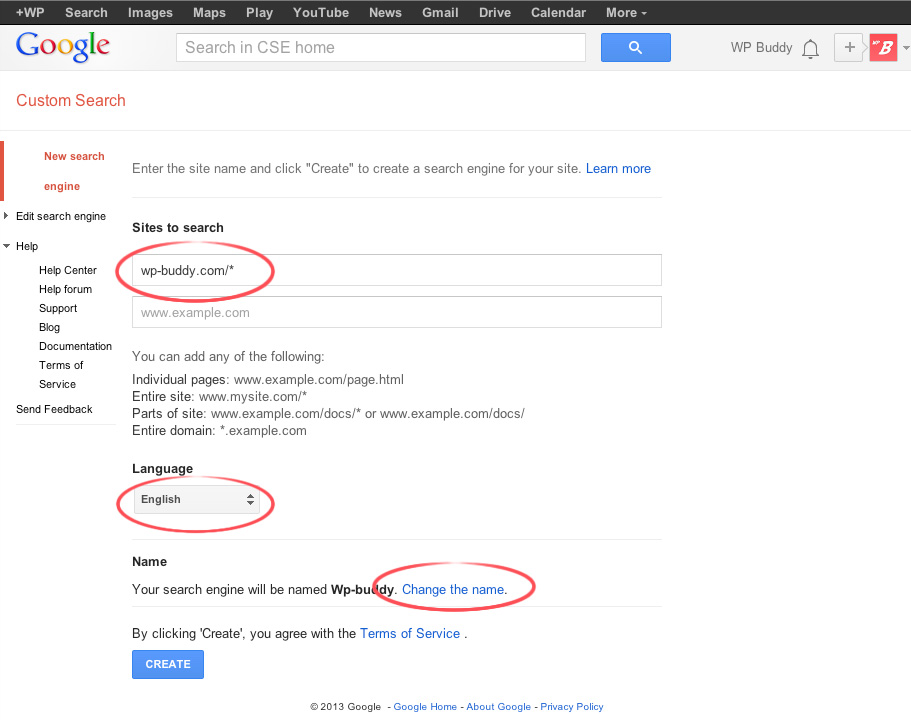
Click the add button to add a new Google Custom Search - A new area will appear. In the field where it says “Sites to search” enter your domain name followed by an asterisk (*) like this:
http://wp-buddy-web.local/*
Note: Do not forget the asterisk at the end! Otherwise the custom search engine will only search the homepage of your domain. - Also select your language and the name of the search engine:
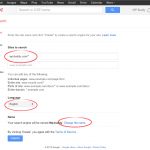
Select sites, language and name - The click the big fat “CREATE” button.
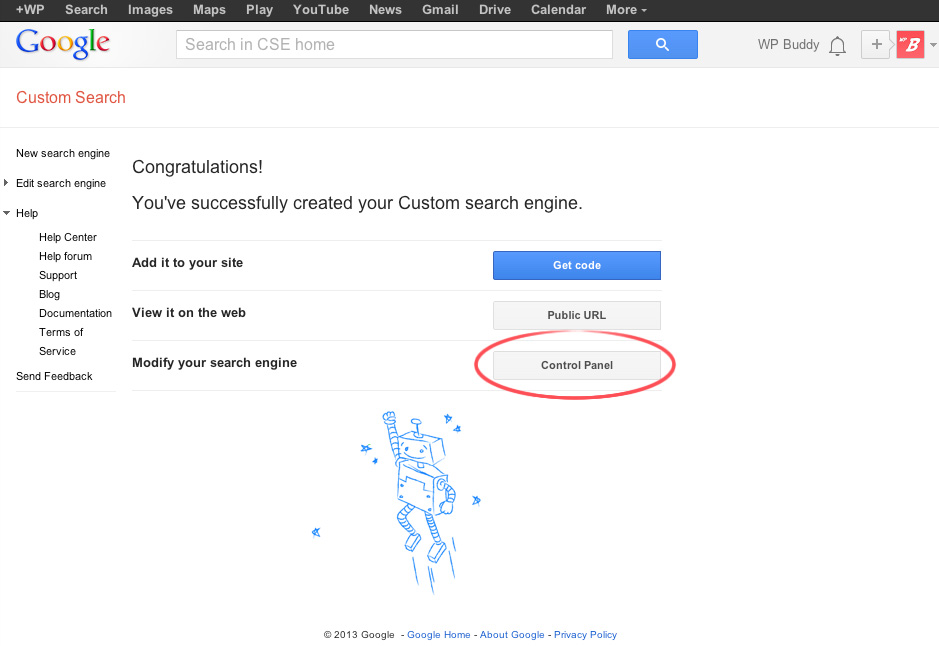
- After that three different buttons will appear. Click on the button which says “Control Panel”.
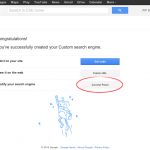
Click the Control Panel button - That’s it for now.
3. On-Demand Indexing and On-Demand-Removal
3.1. How On-Demand-Indexing works
On-Demand-Indexing and On-Demand-Removal are quite some awesome functionalities while using the Google Custom Search together with WordPress. Normally when you publish a post you have to wait till Google is crawling your website again to find the new page. This lead to problems especially if you’re using your WordPress blog as a shop.
Here is an example:
Consider you’re running a shopping plugin like WooCommerce on your blog. You’ve also integrated the Google Custom Search code into your theme or via a plugin (maybe you’ve used my Google Custom Search WordPress Plugin). Ok. You’ve planned to launch a new product today (maybe a new Camera) and therefore published this product via WooCommerce. Cool. But if a user is now searching for your product the Custom Search cannot find anything. Why?
Look at the graph below and you will see what I mean:
It will take some time till Google has crawled and index your new page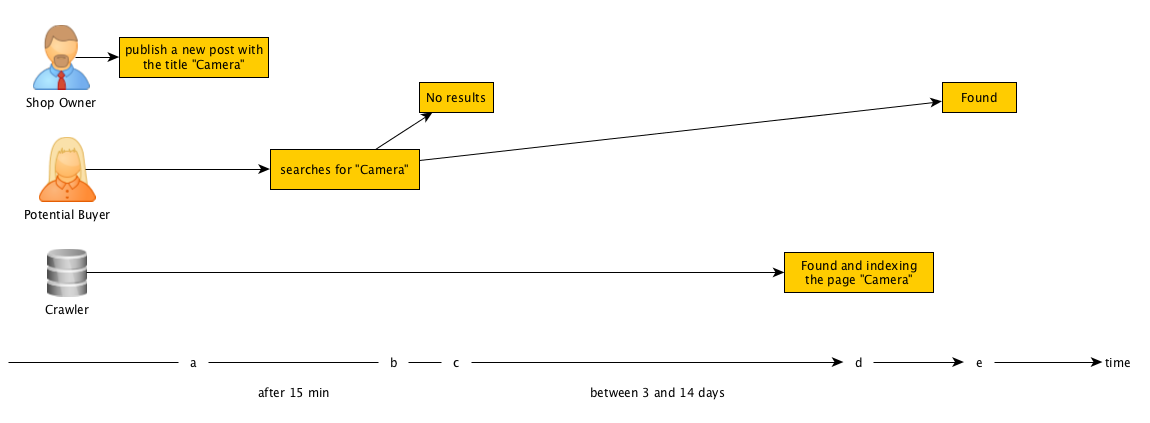
When a user is searching for a post that was published already but not indexed by the crawler he/she will not find the page. This is because it depends on the crawler. When it stops by and find your page it gets indexed. Luckily this will be during the next view minutes when you’ve published the new post. But in 99% it’s not the case. Normally a crawler stops by every 3 to 14 days (depending on how frequently you publish new posts).
To speed this up there is a technology called “on demand indexing”. Please take a look at the next picture:
Send an on-demand-index request for immediate indexing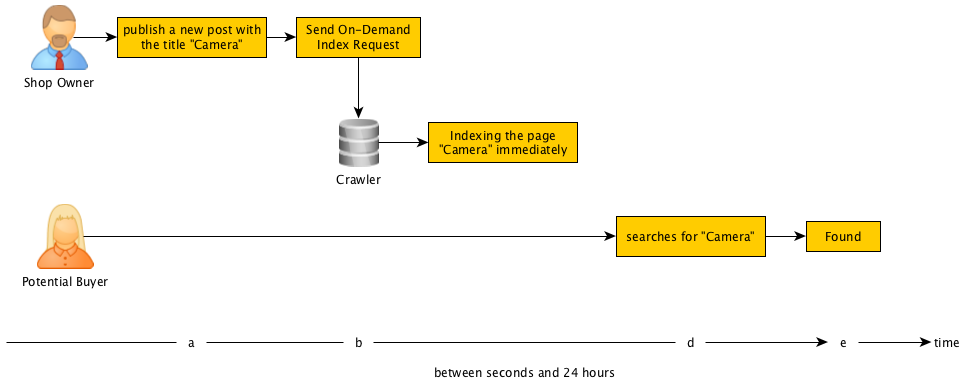
You see that by using this technology the crawler can index your new page much quicker than before.
[box type=”info”] Google guarantees that the new page will be indexed in the next 24 hours after sending a on-demand request. But my experience has shown that on-demand indexing is taking place just minutes after sending the request.[/box]
3.2. How On-Demand-Romoval works
With On-Demand-Removal it’s nearly the same, I think there is no need to explain this at all. It’s just the other way around :-)
3.3. How to send an On-Demand-Index Request
You have at least three options to tell Google that a new page should be indexed immediately:
- By manually submit the new URL (you can read how it works below).
I think that this is not the best idea because you always have to log-into the the Custom Search Admin panel to submit it. - Write a plugin which is using the Custom Search API
You need some skills in coding plugins for WordPress as well as general PHP skills. - Or by just using my Google Custom Search WordPress Plugin.
3.3.1. Manually submit the URL
- Login to your Google account
- Go to your Custom Search Control panel and choose the search engine you want to edit (click on it)
- Go to “Setup” and “Indexing”
- Enter the URLs to be indexed in the field where it says “Specific URLs”, one per line. Please note that URLs must be from sites you have verified in Webmaster Tools.
- To request a removal of an URL from your search engine you have to prefix the URL with a “–“.
- Click “Index now”.
3.3.2. Write a plugin using the Custom Search API
I don’t want to go deeply into coding WordPress plugins but for a quick start here are some hints:
- The API page you need is the following one: https://developers.google.com/custom-search/docs/api
- To authenticate a user you can only use the ClientLogin method (which is deprecated but the only authentication method which works for the Custom Search API)
- There are some mistakes in the documentation. For indexing (and removal) you have to use the URL
- http://www.google.com/cse/api/<USER_ID>/index/<CSE_ID> instead of
- http://www.google.com/cse/api/<USER_ID>/cse/<CSE_ID>/index/ for example.
3.3.3. Use the Google Custom Search WordPress Plugin

Of course, this is the easiest way for all of us. Using a plugin that was well written and does everything for you is not only easy it also saves you both, a hell of a lot money and time as well.
It allows you to:
- Configure the Custom search the way you like it
- Customize the Layout directly on the settings page
- It gives you detailed information what it does and when errors occur
- It sends On-Demand-Index and -Removal Requests if you want.
Check out the following screenshots:

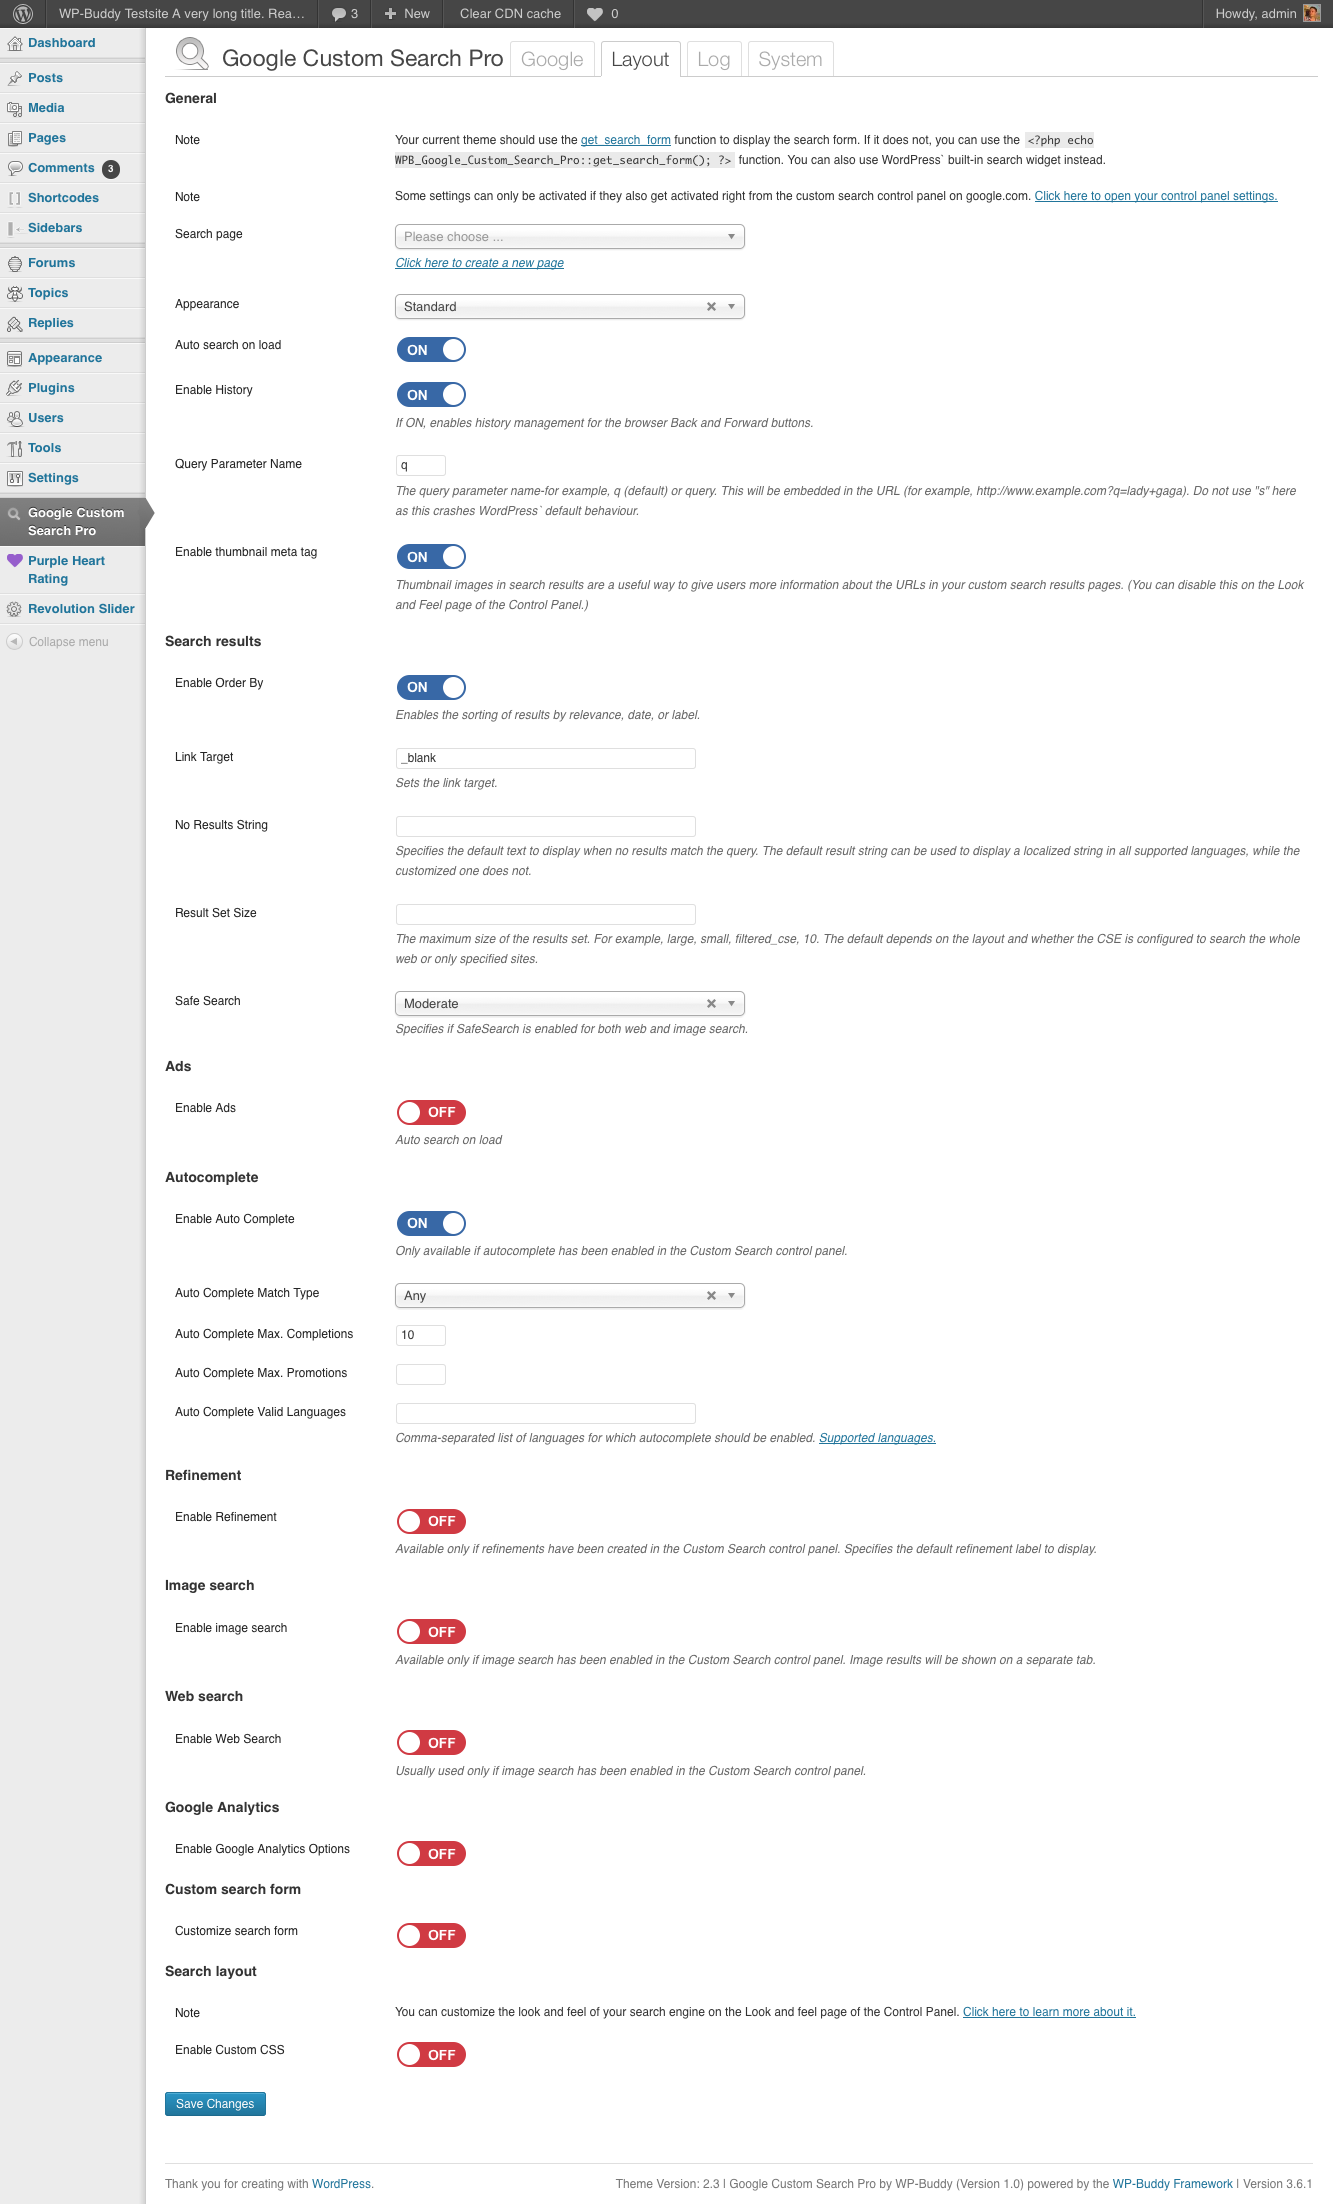


Buy the Google Custom Search WordPress Plugin now
3.3.4. A word about On-Demand-Index and -Removal Quota
In the free version of Google’s Custom Search Engine you have a quota of 200 pages for on-demand-index and 50 for on-demand-removal. If the quota is depleted it’s possible to continue to send requests but you will get an error saying that you’re over quota. If you need more quota, you can inform yourself on the Indexing quota help page about the costs.
Note that it’s not really clear when the quota is set back. I was in contact with a Google employee but he couldn’t answer my question (!) accordingly. He just said that they will set back the quota “from time to time” automatically. Whatever that means. My experience is that it’s not a monthly-thing. The quotas of some of my customers were set back between one and two months.
4. How to configure the Custom Search engine via the user interface
When you log yourself into the Custom Search Administration Panel and choose one of your search engines you will see a lot of setting options:
- Setup
- Basics
- Make money
- Admin
- Indexing
- Advanced
- Look and Feel
- Layout
- Themes
- Customize
- Thumbnails
- Search features
- Promotions
- Refinements
- Autocomplete
- Synonyms
- Advanced
- Statistics and Logs
- Stats
- Google Analytics
- Audit log
- Business
- Settings
Of course, this depends on what you want to achieve and how it should look like on your own website. So in this section I just want to talk about general things that are possible with Google’s Custom Search Engine.
4.1. Setup
- On the Basics tab you give your search engine a name, a description and some keywords.
- You can upgrade to the business version (which is then called “Google Sitesearch” instead of “Google Custom Search”).
- It’s possible to activate the image search (please note that there are some limitations when using the free version).
- You can define the language and
- you can set some labels for a better refinement of the search (I will write more about that later).
- On the “Make money” tab you can connect your AdSense account with the search engine to make money with the ads that are displayed.
- On the “Admin” tab it’s possible to add new users who will get access to the search engine settings.
- The “Index” tab was already mentioned in the On-Demand-Index and -Removal section above. Please see this section if you need more information. This tab also shows you the current status of your Indexing and Removal quota.
- On the “Advanced” tab you can upload a setting-file (called “context file”) which specifies a complete search engine – everything from “look and feel” up to “how annotations should be used”.
There are also some buttons on the basic tab:
- Click the “Search Engine ID” button to see the ID in a small window. The naming convention of this is a little bit confusing. The first part of the above mentioned code (before the colon) is your Google User ID, the second part (after the colon) is the engine ID. Altogether it’s called “Search Engine ID”.
- Click the “Public URL” button to see the public URL of your search engine. You can also access your search engine via this URL if necessary.
- Click the “Get Code” button to see the Javascript code that you need to integrate the search engine in one of your pages. Please note that the code uses an unknown HTML markup (<gcse:search></gcse:search>) which will be deleted by WordPress’ built-in text editor automatically. It’s better to integrate this code into one of your template files (or using my plugin instead).
4.2. Look and feel
- On the “Layout” tab can choose between different styles. Possibilities are “Overlay”, “Two page”, “Full width”, “Two column”, “Compact”, “Results only” or “Google hosted”.
- On the “Themes” tab you can set up the colours that are used to show the search results.
- It’s also possible to customize even more on the “Customize” tab. For example the font, the search box and the button.
- On the “Thumbnails” button you can activate if the search results should show thumbnails or not. You should always keep activated this because it delivers more information to your customer.
4.3. Search features
- On the “Promotions” tab it’s possible to add your own ads in your Custom Search engine. This helps if you want to promote a new product always when a user searches and even when it’s not included in the current search. I think this is a nice feature. Learn more about Promotions in Google’s Custom Search on this help page.
- The “Refinements” tab is used to add new Labels that get shown on your search results page. You can use the refinements (labels) on the “Setup” -> “Basics” tab. Scroll down to the “Sites to search” section and add a new filter. A new window will appear on where you can choose the label you’ve created on the “Refinements” tab.
- I think the tab “Autocomplete” is self explanatory. You can also add your own Custom Autocompletions if you think it will not work as you would expect it.
- The tab “Synonyms” is avery powerful functionality, too. Here it’s possible to add synonyms for particular expressions a user might use. For example you can define the word “auto” as a synonym for “car”. If a user types in “auto” your Custom Search engine will also find results with the word “car” in it.
- The “Advanced” tab on the “Search features” settings page is also very interesting. Here you can choose if the search results should be sorted (maybe by date, relevance or whatever you want). It’s also possible to change the settings for the Websearch and Image search functionality.
4.4. Statistics and Logs
- On the “Stats” screen you can see some statistics. But it’s better to use Google Analytics instead as it provides more data.
- As I mentioned earlier in this post you can link your Custom Search with Google Analytics by just selecting a profile on the “Google Analytics” tab.
- The “Audit log” tab shows the latest activities from the users who have access to manage your custom search.
4.5. Business
The “Business” section is quite clear. There is only one setting to change. And that is if you want to show ads in search results or not. If you choose “no” you have to pay for the Custom Search Engine (which is then called Sitesearch instead). The only exception is if you are using the Custom Search engine as a charitable organization. If so the Sitesearch engine is free for you.
5. How to integrate the Google Custom Search into WordPress
5.1. Possibilities
As in real life you always have multiple possibilities to reach a goal. You can either:
- Add the Custom Search Code to a page on your WordPress (by creating a WordPress custom search page)
- Add the code to one of your themes template files
- Or just use a plugin that does everything for you.
5.2. Create a WordPress custom search page
I guess this is the worst solution. That’s why I do not recommend it. In fact I will not describe how this works in detail as it will always lead to problems:
- The code of your Custom Search always looks like this: <gcse:search></gcse:search>. This is not a valid HTML markup and that’s why WordPress built-in editor will delete this line. Of course it will work when you add the code to the sourcecode of a page (switching to Text-Mode rather than the Visual-Mode). But if you once forget so switch modes the code will be deleted. And you will not recognize it till one of your users is complaining why the search is not working :-)
- You cannot use the included search-form from your theme or the widget. Because using it will redirect a user to the themes search.php template rather than the page where you’ve added the code I’ve mentioned above.
5.3. Add the code to one of your themes template files
This, of course, is a much better solution. By using your themes search.php template file you can replace the original code with the Google Custom Search Engine code. But there are also some problems that can occur:
- You have to be familiar with HTML, CSS and PHP. If you’re not familiar with at least one of these languages it can be difficult to get this to work.
- The next thing is that if you hardcode the searchcode into a template file it might get overwritten when an update is available.
5.4. Use a Google Custom Search WordPress Plugin that does everything for you
Of course, this is the best solution. If you’re interested in such a plugin, please check out my Google Custom Search WordPress Plugin.
- It uses WordPress hooks to replace the WordPress custom search form.
- It adds a search page automatically to your list of pages without the need to add any custom codes.
- It also allows you to replace your themes built-in search form so that it looks good even after you’ve activated the plugin (see video below).
6. How to configure the Google Custom Search WordPress Plugin
There is already a detailed page that describes how to configure the Custom Search WordPress Plugin. So if you’re interested in how this works, please check out this page.
7. Conclusion
Al right. That’s it. I know this was a real fat blog post about Google’s Custom Search and Sitesearch. But I also know that there are still some things missing. I did not go very deeply into coding as I do not know what kind of readers I have. If you’re not a developer it’s maybe easier to read. If you’re a nerd I’m sure you can handle everything on your own :-)
But I hope that this gave you a little insight on how powerful Google’s Custom Search can be for WordPress. It’s a complex topic but I know it’s worth the effort. Even when you have a great plugin like the Custom Search WordPress Plugin that helps you setting everything up step-by-step.
If you have any question, please don’t hesitate to contact me via email or by just writing a comment below.
[purple_heart_rating description=”So that we are getting better and you can benefit even more from our blogposts.”]