Layout settings
General
Favicon
The Favicon that is displayed in the browsers tab (if supported by the browser). The standard-icon is this one:

“Go to top button”
Whether the “go to top” button should be displayed when a user scrolls down. This is how it look like.
![]()
Homepage or Blogpage
Header
Title
The title that should be shown on the home- or blogpage. You can use shortcodes in this field. Maybe an icon:
C[icon icon='heart']DING
Subtitle
The subtitle that should be shown on the home- or blogpage
Text
A description about yourself.
Signature
Maybe your name, your short name or your nickname.
Header Image
The background image that is used for the home- or blogpage.
Header-Image position
The position that is used to display the header image. Learn more on CSS background position on W3Schools.com.
Header background pattern
The background pattern that is used for the header on the home- or blogpage.
Header background color
An alternative color that is used (if you don’t want to use a background pattern) for the header.
Chart section
Title
The title for the chart section. You can use shortcodes in this field. Maybe an icon:
C[icon icon='heart']DING
Subtitle
The subtitle for the chart section.
Text
A description about the chart section.
Table icon
The icon to use for the chart-section table. The default is “picture”. You can choose between several FontAwesome icons. Here you can find all FontAwesome icons. Please note that not every icon is integrated in every theme. For more information on what version of FontAwesome is integrated in the theme, please read the changelog.
Columns
Enter a name of a column and hit enter to add it. You can drag&drop it by moving the reorder-icon: ![]()
Rows
The actual rows in the table. Enter a name and a percentage separated by two colons like this:
- Label (will be displayed as the name)
- :: (the separator of the label and the value)
- Value (the actual length of the bar in percent)
Example:
Coding::80
The value (in the example above it’s ’80’) describes how long the bar will be. In the example above the bar will be 80% long.
- You can make bars longer than 100% to highlight one of your qualifications. But on smaller displays this can cause bad-looking effects. Do not make the bars longer than 110% is a good choice.
- You can make bars smaller than 0% (maybe -10%) but this can overlay the actual text (it depends on the label name length).
Career section
Title
The title for the career section. You can use shortcodes in this field. Maybe an icon:
C[icon icon='heart']reer
Subtitle
The subtitle of the career section.
Bubbles
Enter a bubble name, a description and a offset from top.
- Label
- :: (separator)
- Description
- :: (separator)
- Offset from top
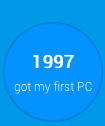
1997::got my first PC::20
The above displays the following:
Note the following:
- The label will always be bolded
- There really not a lot of space to add a description. So keep it short!
- The last value is the offset from top. If you want to create a typical ‘ladder of your career’ you should start with higher numbers and end up with lower numbers.
- The colors of the bubbles are generated randomly.
- The last bubble will always be green (because this should be the thing you do the most at the moment)
Portfolio section
Title
The title of the portfolio section. You can use shortcodes here like this:
P[[icon icon='heart']]rtfolio
Subtitle
The subtitle of the portfolio section.
Text
A short text to describe what’s in the portfolio section.
Standard Link (maybe to a detailed portfolio page)
A link that is used as a standard to link the portfolio items.
Items
The portfolio items to show. Click into the text-field to include an image. This image should have the following size: 130 x 130 pixels.
- ID of the Attachment
- :: (separator)
- Label (the actual name)
- :: (separator)
- Link (maybe to a page or a post)
Check out this example:
415::Envato::http://my-website.com/portfolio/envato/
This will do the following:
- Add the attachment (image) with the ID of 415
- Use the string “Envato” as the title
- Use http://my-website.com/portfolio/envato/ as the link when clicked on the item
Contact section
Title
The title of the contact section. You can use shortcodes here like this:
C[[icon icon='heart']]ntact
Subtitle
The subtitle of the contact section.
Text
Some text that displays before the contact form.
Captcha + E-Mail Adress
Add the captcha-field and define your E-Mail address in the extended tab.
Colorization
Colors
Background color and image
WordPress has already an integrated background-image functionality. Click on the link to go to that specific page. Please save your settings first!
Background pattern
The background pattern to use for the whole page.
Use my own colors
Activate this if you want to use your own colors
Text color
The standard color for text.
Link color
The standard text for links.
Link color hover
The standard color for links on mouseover.
Title color
The color of the header-title.
Menu link color
The standard color for the links in the menu.
Menu background color
The background color for the menu.
Footer background pattern
The background pattern of the footer area.
Footer background color
The background color for the footer area.
Footer Link color
The color of link si
LESS Variable Changer
You can overwrite some LESS variables in the theme. Click here to learn more about the LESS variables that can be changed in the One Page Profile WordPress Theme.
Custom CSS/LESS
Add your custom CSS or LESS syntax here. This will be added to your style.css and will overwrite exiting CSS.
Fonts
Use other fonts
Activate this is you want to use Google’s Webfonts.
Google Fonts
You can search for fonts directly in Googles Webfont library.
Title font
The font to use for the title
Subtitle font
The font to use for the subtitle
Headline fonts
The font to use for headlines
Text font (sans)
The normal text fonts
Text font (serif)
The normal text fonts
Text font (mono)
Mono text fonts (should always be at “Courier” or “Courier New”.
Font variants
If you need more variants of a font (maybe because you’re using it as a normal text font) you should add the variants here. For example you’re using the “Roboto” font you should also consider to add the variants 100, 300, 300italic, italic and 700.
Social Media
Twitter Tweet Button
Via @
The via @ tag to use when someone clicks on the tweet-button (in the footer).
Hashtag #
The hashtag that should be used when someone clicks on the tweet-button (in the footer).
Social Media Buttons
Display Social Media icons in the footer
Activate this if you want to use the social media buttons in the footer
Display RSS Icon
Displays the Feed-Icon in the footer.
Google+
Enter your URL to the profile on this social media platform.
Enter your URL to the profile on this social media platform.
Enter your URL to the profile on this social media platform.
Linked In
Enter your URL to the profile on this social media platform.
Github
Enter your URL to the profile on this social media platform.
Enter your URL to the profile on this social media platform.
Youtube
Enter your URL to the profile on this social media platform.
Enter your URL to the profile on this social media platform.
Dribbble
Enter your URL to the profile on this social media platform.
Tumblr
Enter your URL to the profile on this social media platform.
Bitbucket
Enter your URL to the profile on this social media platform.
Renren
Enter your URL to the profile on this social media platform.
Enter your URL to the profile on this social media platform.
Skype
Enter your URL to the profile on this social media platform.
Enter your URL to the profile on this social media platform.
Stackexchange
Enter your URL to the profile on this social media platform.
SEO
Analytics
Analytics Code
Enter the Analytics code that you can grab through Google Analytics.
Schema.org
Use Schema.org
Activate this if you want to use the schema.org syntax in the theme. Click here to learn more about Schema.org syntax for WordPress.
Primary purpose of your website
This should be at “Webpage” all times.
Google Plus Authorship
Activate/Deactivate Google+ Authorship
Activate or deactivate Google Authorship. Read the following to learn more about Authorship: How to set up Google+ Authorship
Authors to use for category, archive, search and tag pages
The authors Google+ profile that should be linked with category, archive, search and tag pages.
Google Plus Publishership
Activate/Deactivate Google+ Publishership
Read the following to learn more: How to set up Google+ Publishership.
Your Google Page URL
The URL to your own Google+ Page
Breadcrumbs
Use Breadcrumb
Activate this to display breadcrumbs
Text before Breadcrumbs
The text to show before the breadcrumbs. In most cases this is “You are here:” or something like that.
The name of “Home”
You can rename the name of “Home” to something more appropriate. Maybe: “Startpage” or something like this.
Display Home-Icon
You can also display the “home” icon instead of the title.
Text between Breadcrumbs
This normally is an arrow like this: »
Break long titles
If you have titles that are super long than you can enter a number when the title should be stripped off.
The title is: This is a really super, damn, great long title.
When you enter “20” the title will be shortened to this: This is a really sup…
Extended
Lightbox
Activate/Deactivate Lightbox
Activate or deactivate the lightbox-functionality. Read this article on Wikipedia if you don’t know what a lightbox is.
Scripts
Custom Javascript
Enter your custom Javascripts here. It will be added to the footer.
Forms
Recaptcha Public Key
Enter your reCaptcha public key here if you want to use the built-in spam-filter functionality.
Recaptcha Secret Key
Enter your reCaptcha secret key here if you want to use the built-in spam-filter functionality.
E-Mail Address to use
Enter the standard email address to use for forms.
Footer
Your awesome footer sentence
Enter an awesome footer sentence :-)
Affiliate
Display “Proudly powered by”-Link
If you like you can help us make our themes even more popular. If activated this will integrate a little link back to the themes landingpage.
Your Affiliate-Link
You can also replace the backlink with your own affiliate link. In fact: You can earn money when someone clicks this link and buys the theme. Learn more about our Affiliate Programs here.
Purchase Code
Enter your purchase code here to get notified automatically if an update of the theme is available.