This is the official “Frequently Asked Questions” of the Google Custom Search WordPress plugin.
What are the requirements?
- You need at least WordPress 3.6 running on your self-hosted installation.
- PHP > 5.3
- A Google Account
- A custom search (which you can get at Google.com/cse/ for free)
- Maybe an AdSense Account if you want to earn money with the search engine.
- Your theme needs to use the searchform.php template file so that the plugin can replace the original search form. However, it always works with the standard search widget WordPress provides.
How does it work?
- The plugin replaces the built-in WordPress search engine with a Google Custom Search Engine which is available for free (when showing ads) or paid (no ads)
- For this a separate search page will be generated to show the results
How can I set it up?
- Install the plugin according to the installation instructions in the PDF that was delivered with the plugin
- After activating the plugin click onto the “Google Custom Search Pro” item that appears in the menu
- Please read the How to configure the Google Custom Search WordPress Plugin
I’m getting the error ‘You are using PHP in version X. This version is outdated and cannot be used with the plugin…’ What should I do?
Unfortunately your webserver is not running one of the latest PHP versions. You should consider upgrading to the latest PHP version. There is a small tutorial available here: How to upgrade to the latest PHP versions for WordPress. But please note that this is different from provider to provider. The simplest solution is to just ask your provider on how to upgrade.
How can I remove the padding around the search results box?
You can use the following code in the “Custom CSS” field:
.cse .gsc-control-cse, .gsc-control-cse {
   padding: 0!important;
}
Is it possible to use custom fonts on search results?
Via the Control Panel, Google only allows to set Arial, Verdana, Trebuchet MS, Times and Georgia. But you can overwrite the CSS in the “Custom CSS” field on the plugins settings page. Try to do the following:
.gsc-control-cse {
   font-family: Baskerville!important;
}
Note: If you’re using a custom webfont, make sure that it has been included into the header of your page already.
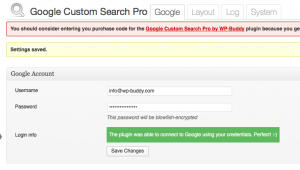
I’m getting the error: ‘Could not log you into your Google account. Please check the Logs tab for more information.’ What’s wrong?
- Check if your username (email address) is right
- Check if your password was entered correctly
- Verify if the custom search engine is yours. This plugin will not work when you’re trying to use your Google account credentials with a search engine that was not created by yourself.
- Try to generate an application-specific password: https://www.google.com/accounts/IssuedAuthSubTokens (read question 8 for more information)
How can I use Application-Specific passwords?
Important: The below information is outdated. Follow these instruction to crate an application specific password instead.
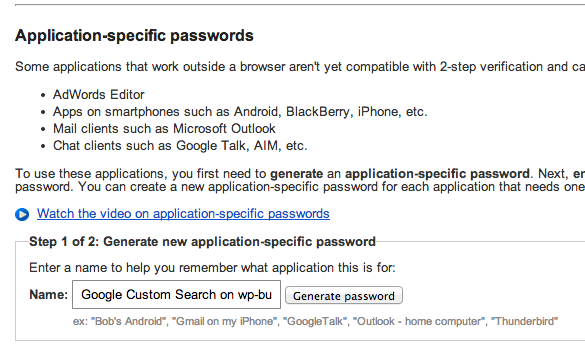
- Go to https://www.google.com/accounts/IssuedAuthSubTokens
- Log-in using your Google Account (if not yet done)
- Scroll down to the section where it says “Application specific passwords”.
- Enter a name into the field. For example “Google Custom Search Plugin on wp-buddy.com)
- If you cannot enter a name you should first sign-up to the 2-step verification.
- Hit the “Generate password”.
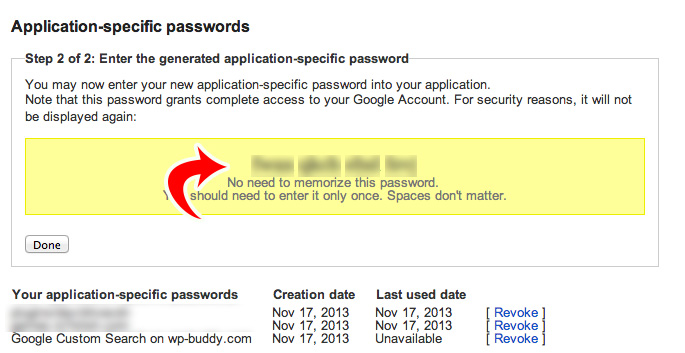
- You will get a password like in this screenshot:
- Copy & Paste the password into the Google Custom Search password field when using your Google E-Mail address:
Google Custom Search Settings

How can I activate thumbnails in search results?
- First of all you have to activate the thumbnail-setting of the plugin. This makes sure that a special meta tag will be included on each page. So please go to “Google Custom Search Pro” > “Layout” > “Enable thumbnail meta tag”.
- Then follow the instruction on how to activate thumbnails on Google Custom Search.
Please note that Google has to crawl your website again to recognize the thumbnails. This can take up to 20 days.
You can also check if the plugin added the meta tag by viewing the sourcecode of one of your posts or pages. Search for something like this:
<meta name="thumbnail" content="http://wp-buddy-web.local/wp-content/uploads/2013/08/google-custom-search-pro-150x150.jpg" />
If this meta tag does not appear. Check if you have added a featured image to your post/page/custom post type. This website shows how to add a featured image.
Does it work with the Avada Theme?
Update: In newer versions of Avada (>3.9) you don’t need any special settings. So you don’t need to follow below instructions any longer. Instead follow the How to configure the Google Custom Search WordPress Plugin video.
Does it work with theme (you name it)?
The answer is: we don’ know. There are thousands of themes out there and we cannot test every single one. A good starting point is to just follow the How to configure the Google Custom Search WordPress Plugin video and see if you can integrate the plugin.
In most cases it works fine. However some themes do not use the get_search_form() function WordPress provides for theme authors to integrate the search form. If the search form has been hard coded, the plugin is not able to replace it. You have to do that manually or ask your developer to do that.
Here is an example on how it works in Avada < 3.9:
Avada uses a searchform.php but unfortunately does not make use of it in its own files. This means that the search field that is included in the header does not use the searchform.php. So it’s impossible for the plugin to hook into that form because it’s hard coded. However you can make Avada compatible yourself. Do the following (version 3.4.3):
- Open the file
/wp-content/themes/Avada/framework/headers/header-main-menu.phpwith your favorite text editor. - OR open the file
/wp-contenet/themes/Avada/framework/headers/sticky-header.phpif you’re using the sticky header functionality. - Search for the search form (in the
header-main-menu.phpthis is between the lines 75 and 78 – in thesticky-header.phpthis is between the lines 102 and 105). And replace it with this simple code:<?php get_search_form(); ?>.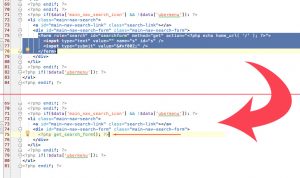
Replace the codes - Then open the file /wp-content/themes/Avada/searchform.php and add this line of code:
<input type="submit" value="" /> - That’s it. Then follow the instructions in this video: How to use the themes built-in search form.
